How to combine ARExample and URP
- Author: Enox Software
- Category: Tips
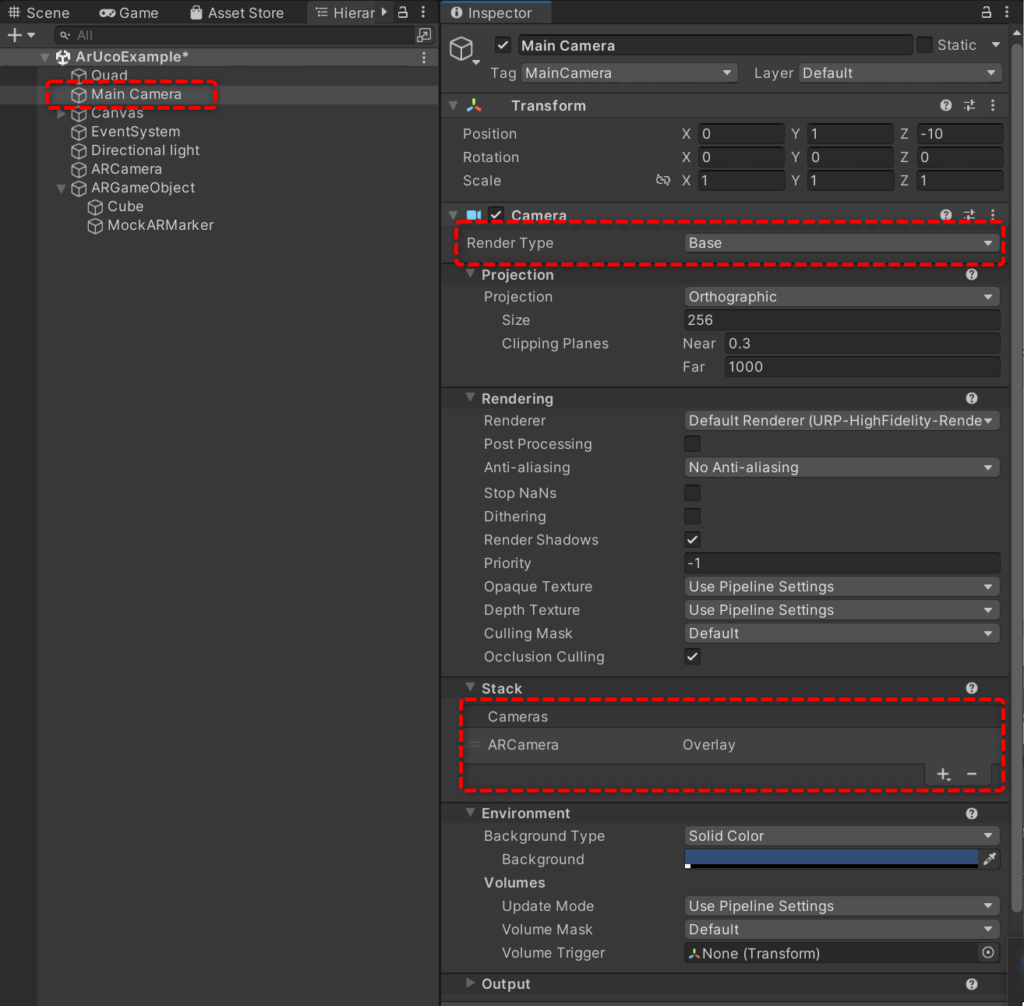
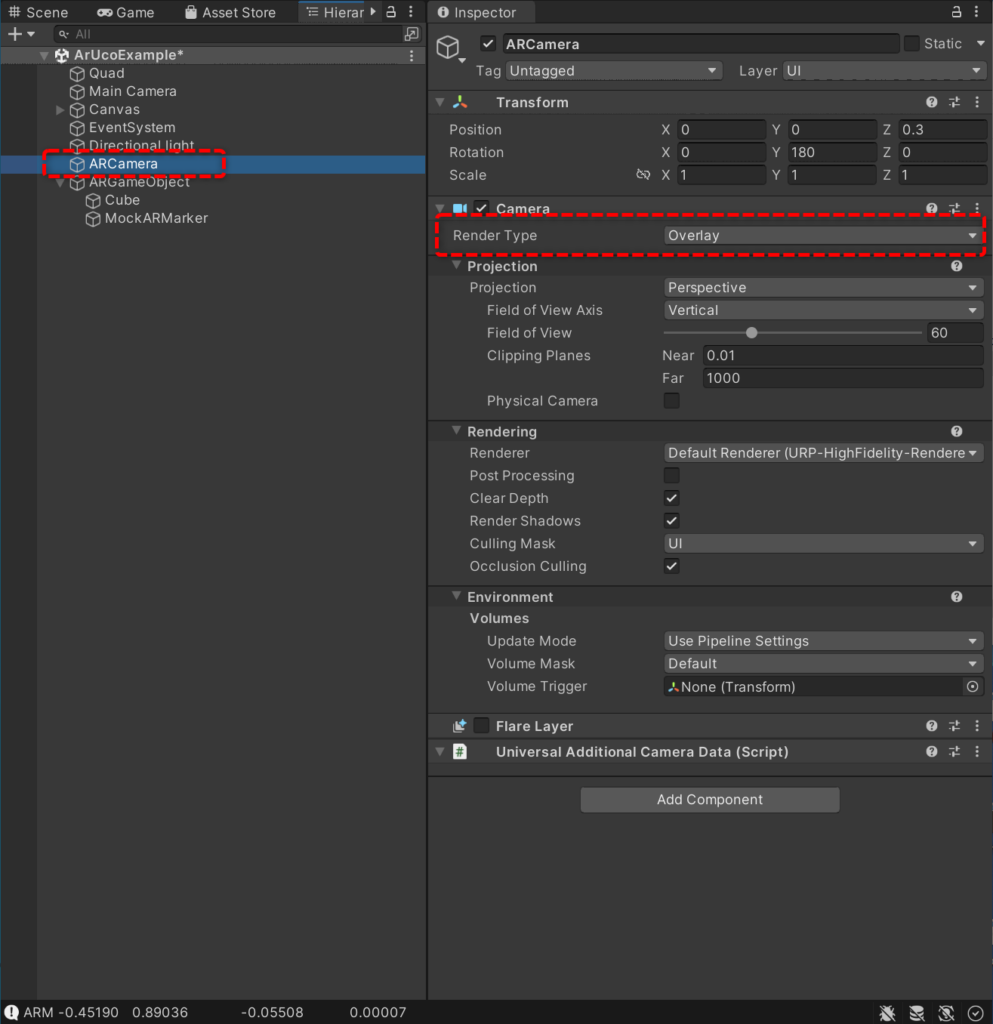
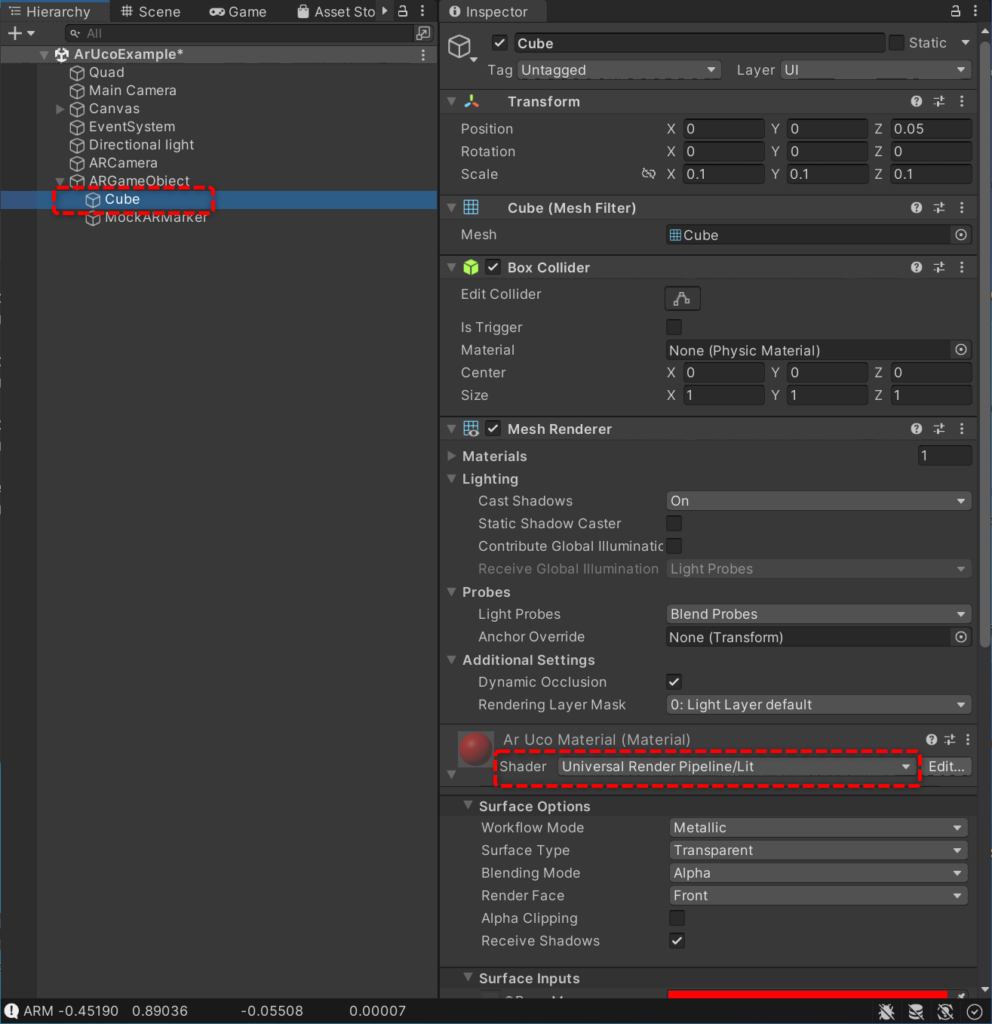
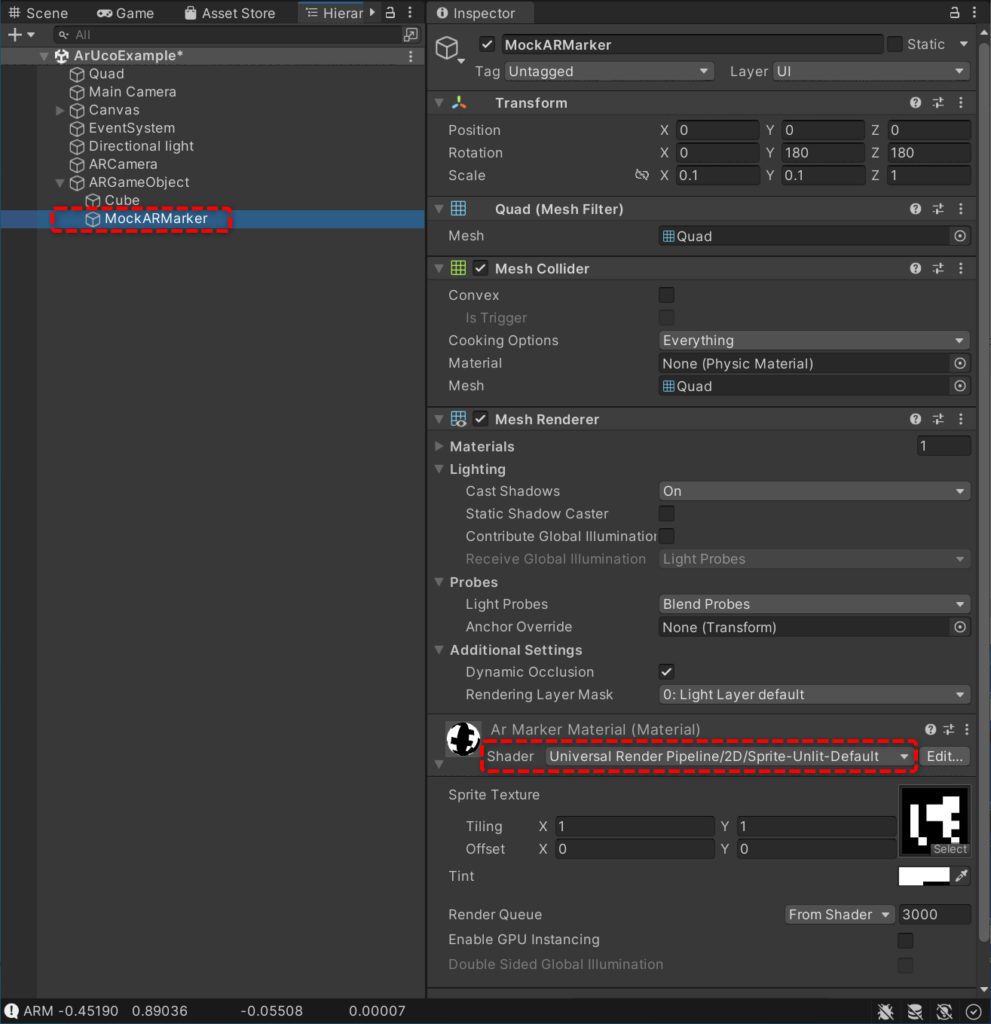
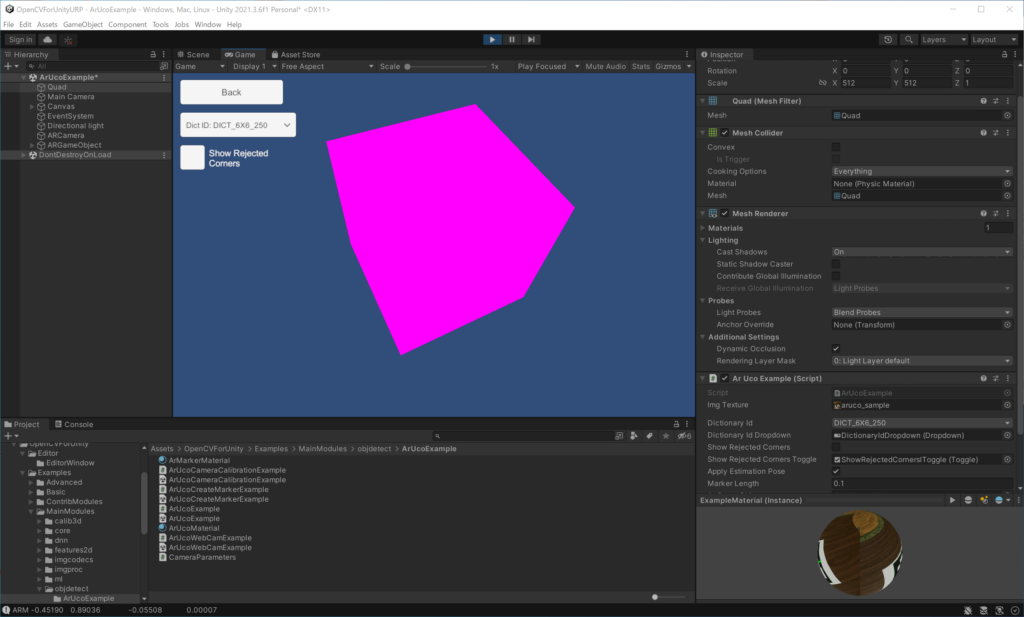
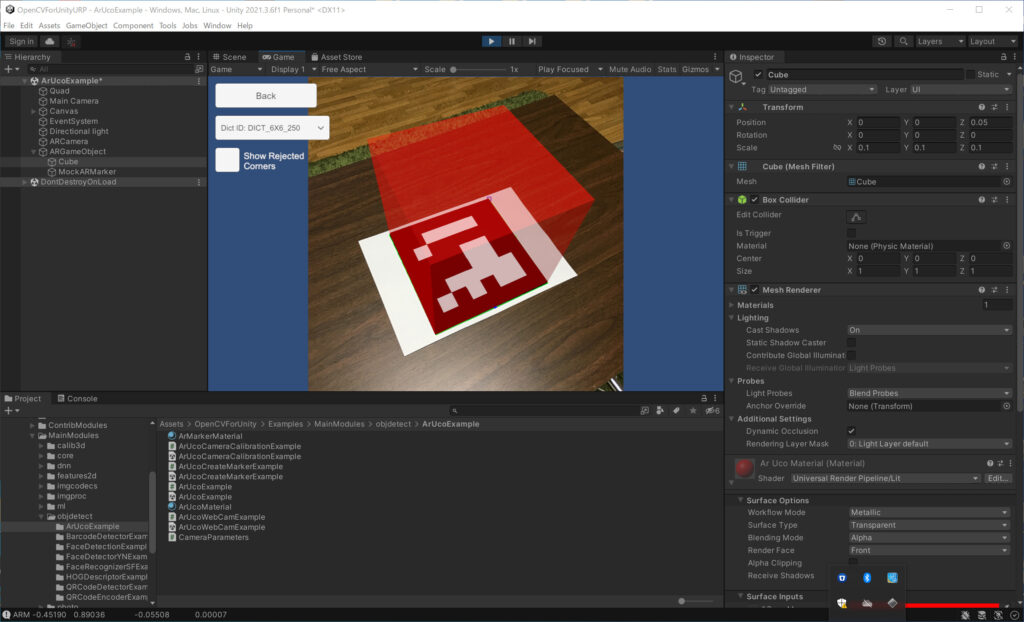
The Universal Render Pipeline (URP) is a prebuilt Scriptable Render Pipeline, made by Unity. OpenCVforUnity itself works fine with any render pipeline, but the ARExample, which superimposes two camera images, does not render well in the URP project. This is because some components of the ARExample are configured for the built-in rendering pipeline. By setting these settings for the universal rendering pipeline, AR objects will render correctly.
- MainCamera
- ARCamera
- Cube
- MockARMarker
ScreenShot
Related posts
How to catch native OpenCV’s errors code (CVException handling)
In order to display the native opencv’s error code, please enclose the code in Utils.setDebugMode(true) and Utils.setDebugMode(false). Example Code: // // CVException handling example // // 32F, channels=1, 3×3 Mat m1 = new Mat (3, 3, CvType.CV_32FC1); m1.put (0, 0, 1.0f, 2.0f, 3.0f, 4.0f, 5.0f, 6.0f, 7.0f, 8.0f, 9.0f); // 8U, channels=1, 3×3 Mat m2 = new Mat (3, 3, CvType.CV_8UC1); m2.put (0, 0, 1, 2, 3, 4, 5, 6, 7, 8, 9); // dump Debug.Log (“”m1=”” + m1); Debug.Log (“”m1.dump()=”” + m1.dump ()); Debug.Log (“”m2=”” + m2); Debug.Log (“”m2.dump()=”” + m2.dump ()); #if UNITY_STANDALONE || UNITY_EDITOR // Publish CVException to Debug.LogError. Utils.setDebugMode (true, false); Mat m3 = m1 / m2; Utils.setDebugMode (false); // Throw CVException. Utils.setDebugMode (true, true); try { Mat m4 = m1 / m2; } catch (Exception e) { Debug.Log (“”CVException: “” + e); } Utils.setDebugMode (false); #else Debug.Log (“”The setDebugMode method is only supported on WIN, MAC and LINUX.””); #endif Execution Result: m1=Mat [ 3*3*CV_32FC1, isCont=True, isSubmat=False, nativeObj=0x820637680, dataAddr=0x820295296 ] m1.dump()=[1, 2, 3; 4, 5, 6; 7, 8, 9] m2=Mat [ 3*3*CV_8UC1, isCont=True, isSubmat=False, nativeObj=0x820637792, dataAddr=0x820619712 ] m2.dump()=[ 1, 2, 3; 4, 5, 6; 7, 8, 9] core::divide_12() : OpenCV(3.4.1-dev) C:\Users\xxxxx\Desktop\opencv\modules\core\src\arithm.cpp:683: error: (-5) When the input arrays in add/subtract/multiply/divide functions have different types, the output array type must be explicitly specified in function cv::arithm_op m3=Mat [ […]
- Author: Enox Software
- Category: Tips
How to run DNN modules with CUDA backend support on Windows platform?
Overview In 2019, a commit was merged that added the option to use the CUDA backend for inference in OpenCV’s DNN module, resulting in faster inference on Nvidia GPUs. If you wish to use this CUDA backend with OpenCV for Unity, it is necessary to build and set up OpenCV as a dynamic library on your own. This article will provide guidance on the process. Steps Build the OpenCV library with the OPENCV_DNN_CUDA flag enabled. Please refer to the article below for instructions on how to build OpenCV with OPENCV_DNN_CUDA enabled. https://learnopencv.com/how-to-use-opencv-dnn-module-with-nvidia-gpu-on-windows/ https://www.jamesbowley.co.uk/qmd/opencv_cuda_python_windows.html https://medium.com/geekculture/setup-opencv-dnn-module-with-cuda-backend-support-for-windows-7f1856691da3 Build with OPENCV_EXTRA_MODULES_PATH and BUILD_SHARED_LIBS enabled. In addition, it is recommended that you download and build the same revision of the source as the OpenCV git link provided in the ReadMe.pdf. OPENCV_EXTRA_MODULES_PATH:PATH=C:/Users/xxxxx/opencv_contrib/modules BUILD_SHARED_LIBS:BOOL=ON Copy the built dll files to the Plugins folder. Replace the opencvforunity.dll file in the Extra package with opencvforunity.dll in the Plugins folder. To enable the CUDA backend, change the code as follows. net.setPreferableBackend( Dnn.DNN_BACKEND_CUDA); net.setPreferableTarget( Dnn.DNN_TARGET_CUDA); Result
- Author: Enox Software
- Category: Tips
Mat Basic Processing2
These codes are included in the OpenCVForUnity Example Unity scenes. (MatBasicProcessingExample) Merge Example Code: // // simple composition: Merge example // // 2×2 matrix Mat m1 = new Mat (2, 2, CvType.CV_64FC1); m1.put (0, 0, 1.0, 2.0, 3.0, 4.0); Mat m2 = new Mat (2, 2, CvType.CV_64FC1); m2.put (0, 0, 1.1, 2.1, 3.1, 4.1); Mat m3 = new Mat (2, 2, CvType.CV_64FC1); m3.put (0, 0, 1.2, 2.2, 3.2, 4.2); List<Mat> mv = new List<Mat>(); mv.Add (m1); mv.Add (m2); mv.Add (m3); // merge Mat m_merged = new Mat(); Core.merge (mv, m_merged); // dump Debug.Log (“”m_merged=”” + m_merged.dump()); Execution Result: m_merged=[1, 1.1, 1.2, 2, 2.1, 2.2; 3, 3.1, 3.2, 4, 4.1, 4.2] MixChannels Example Code: // // complex composition: mixChannels example // // 2×2 matrix Mat m1 = new Mat (2, 2, CvType.CV_64FC1); m1.put (0, 0, 1.0, 2.0, 3.0, 4.0); Mat m2 = new Mat (2, 2, CvType.CV_64FC1); m2.put (0, 0, 1.1, 2.1, 3.1, 4.1); Mat m3 = new Mat (2, 2, CvType.CV_64FC1); m3.put (0, 0, 1.2, 2.2, 3.2, 4.2); List<Mat> mv = new List<Mat>(); mv.Add (m1); mv.Add (m2); mv.Add (m3); // mat for output must be allocated. Mat m_mixed1 = new Mat(2, 2, CvType.CV_64FC2); Mat m_mixed2 = new Mat(2, 2, CvType.CV_64FC2); MatOfInt fromTo = new MatOfInt (0,0, 1,1, 1,3, 2,2); List<Mat> mixv = new List<Mat> (); mixv.Add (m_mixed1); mixv.Add (m_mixed2); // […]
- Author: Enox Software
- Category: Tips